|
<< Click to Display Table of Contents >> Evidence |
  
|
|
<< Click to Display Table of Contents >> Evidence |
|
The evidence for a section may be created or edited by clicking the ![]() icon in the Edit view.
icon in the Edit view.
If the section already contains evidence items, the icon will change to green ![]() . Rolling over the icon with the mouse will display the number of items.
. Rolling over the icon with the mouse will display the number of items.
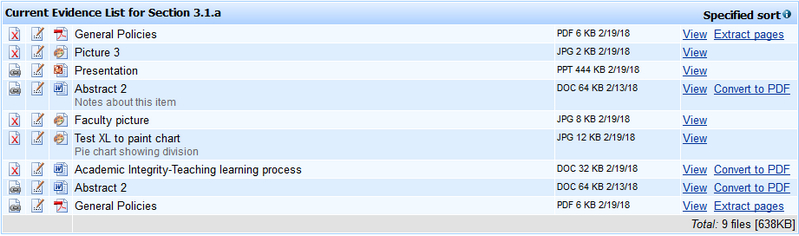
Evidence items are displayed either in alphabetical order or in a specified order. This is configurable. See Manage Standards > [Standard] > Properties
Some agencies include information about the evidence required for certain sections. If this information is provided, an Evidence checklist link will appear next to the section number. Click on the link to view this information.
Evidence consists of files or Uniform Resource Locators (URL's) that are added to the section of a standard as supporting artifacts.
Items may be added in a number of ways:
1.From File on a local resource, e.g. your workstation's hard drive
2.By entering a URL
3.From the Xitracs Library
4.From the standard's current All Evidence list using the QuickPick function
The evidence page for the specific section will list any items currently being used, in an editable order, together with buttons to add new items.
If the section has a status of Complete or the standard is Locked, the edit buttons will not appear.
If the section is set as Confidential, you will have the option to designate individual items as confidential. These items are highlighted by the ![]() icon.
icon.
If the standard is in Response mode, the cycle information will appear. See Response Cycles for further information.
Note: If an item has been linked in the narrative, the delete icon will be replaced by ![]() . Click on the icon to view the links.
. Click on the icon to view the links.
1.Click the File button
2.Enter an item Title
3.If the file is a PDF you will have the option to enter a page number where the document will open when viewed.
4.Enter an optional Description
5.If you are in a confidential section, an option to designate the item as Confidential will be available.
6.Locate the file to upload using the Browse button
7.Click Submit
Depending on the size of file, there will be a brief delay during the upload process after which a receipt page will display confirming the file has been added to the evidence list.
Note: Files with extensions .exe .bat .java .jsp .js will be rejected
1.Click the URL button
2.Enter an item Title
3.Enter an optional Description
4.Enter the URL
5.Click Submit
![]() Take care when adding URLs as evidence. Most agencies require that evidence items are integral to the published submission. While a URL link to a general site, such as the institution website, would be acceptable, URL links to documents on a remote server may not be.
Take care when adding URLs as evidence. Most agencies require that evidence items are integral to the published submission. While a URL link to a general site, such as the institution website, would be acceptable, URL links to documents on a remote server may not be.
1.Click the Library button
2.Search through the folders to locate the item
3.Click the check box next to the item(s) to be added
4.Click Submit
5.If the file is a PDF you will have the option to enter a page number where the document will open when viewed.
6.Enter an optional Description
7.Click Submit
Note: When an item is selected from the library, it is copied into the evidence list for the standard. If the original item in the library is later edited or deleted, it will not affect the copy of the item in the standard. This is important to maintaining the integrity of a published submission.
If a file is a multi-page PDF, an Extract pages link will appear. Click on the link to select one or multiple contiguous pages and create a new evidence item.
The QuickPick function allows the user to select one or more items that have already been used as evidence elsewhere in the standard. This avoids having multiple copies of the same item when it is used in multiple sections throughout the standard. For example, if a Policy Document is to be used as evidence in Sections 2.1, 3.4 and 4.2, it need only be uploaded or copied from the Library once into Section 2.1; from then on the user can use the QuickPick function to link the same item to Sections 3.4 and 4.2.
1.Click the QuickPick button
2.If the section containing the desired item is known, choose the section number using the drop-down selector to display evidence items in use for that section of the standard. Note that only sections containing evidence are displayed. Sections that have a setting of Confidential are not listed.
3.Alternatively, click the List all link to display all evidence items used all sections.
4.Click the checkbox next to the item(s) to be added to the target section
5.Click Submit
Note: Items added using the QuickPick function are linked and not copied. This means that if the item in the All Evidence list is edited or deleted, it will affect all instances of the item in the standard. This is particularly useful where a correction needs to be made to an evidence item. It need only be edited once in the Evidence List and all instances will automatically be updated.
1.Click the ![]() Edit icon
Edit icon
2.If the file is a PDF you will have the option to enter a page number where the document will open when viewed.
3.Edit the item Description as appropriate
4.Change the Sort Position as appropriate (this is the position where the item will appear in the list if the properties are set to specific sort.)
5.Select Exclude from evidence list as appropriate (see below)
6.Click Submit
Note: To edit the Title of an existing item, you must first view the item in the main Evidence list for the standard, then click Edit. Only users with a Manager role are able to view items from confidential sections in the main evidence list.
Items that have been added as evidence for a section may optionally be excluded from the evidence list by checking the Exclude box in the Item Edit mode. This is useful when certain items have been added solely for use as graphics in a section narrative. Excluded items are highlighted by the ![]() icon.
icon.
1.Click the ![]() Delete icon
Delete icon
2.Click Yes to confirm
![]() If you attempt to delete an evidence item that is linked in the narrative you will receive a message that you must first remove or change the link in the narrative.
If you attempt to delete an evidence item that is linked in the narrative you will receive a message that you must first remove or change the link in the narrative.
Note: Deleting an item from a section evidence list will remove it from that section only. If it is being used elsewhere, in other sections of the standard, it will continue to appear on the All Sections Evidence List.
If an evidence item is a Word file (.doc or.docx), you can convert it to a PDF file. Click the link and follow the steps.
![]() If you choose to create a new file instead of replacing the existing Word file, be sure to update any links in the narrative.
If you choose to create a new file instead of replacing the existing Word file, be sure to update any links in the narrative.